Custom Inflatable Tents for Brand Activations: Branded Event Space Guide
Custom Inflatable Tents for Brand Activations: A Guide to Planning Branded Event Spaces
Choose the event layout before you choose the tent.
For a brand activation, the right custom inflatable tent depends on the available site, what visitors need to do, where they approach from, what needs to be visible and how the event will be installed and delivered.
Start with the event objective and footprint. Then decide the tent size, openings, internal layout, branding surfaces and any supporting structures.
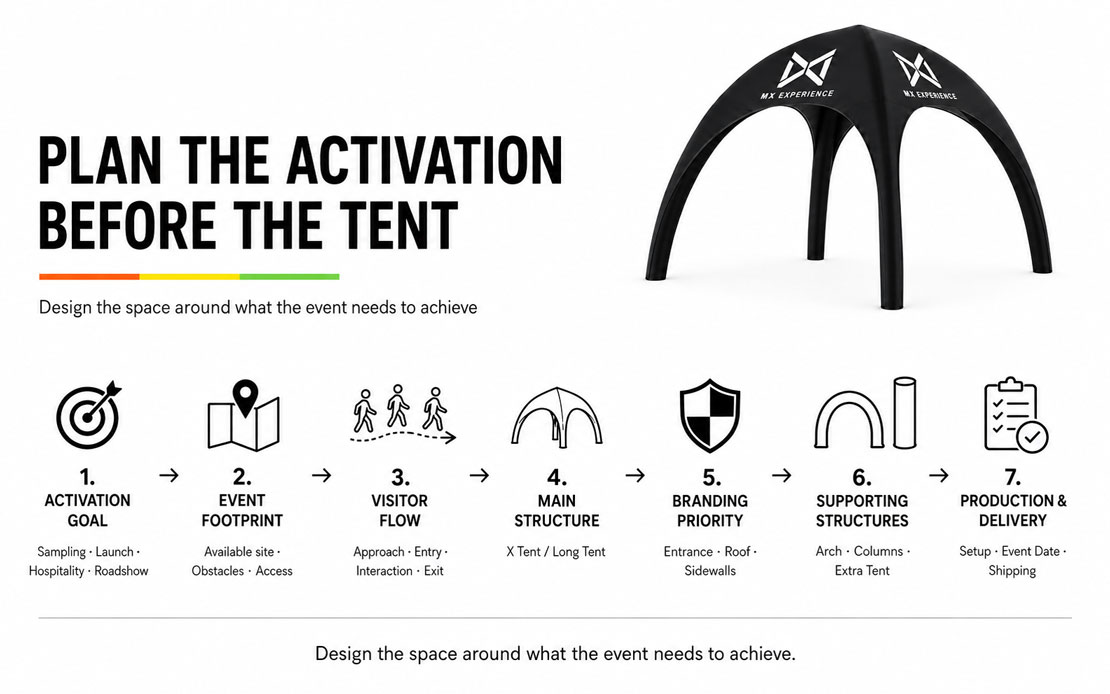
For most projects, the planning sequence is:
Activation Goal → Event Footprint → Visitor Flow → Main Structure → Branding → Supporting Structures → Production and Delivery
Custom inflatable event tents are widely used for brand activations, product launches, sponsor zones, festivals, sports events and experiential marketing because they combine a temporary event space with large branded surfaces. Current industry suppliers position them around these same commercial use cases.
In This Guide
- Start with the activation goal
- Plan the event footprint
- Plan visitor flow
- Choose the main structure
- Prioritize branding surfaces
- Decide whether supporting structures are needed
- Know when an inflatable tent is not the right choice
- Keep the activation visually consistent
- Plan setup and timing
- Use the final planning checklist
- FAQ
Start With the Brand Activation Goal
Decide what visitors need to do before deciding what the space should look like.
A sampling activation needs room for staff, products and short visitor interactions. A product launch may need a controlled display area and space for people to stop. A sponsor hospitality area has different requirements again.
For a touring roadshow, portability and repeatability become more important. The same branded structure may need to work at several locations while keeping a consistent identity.
Before MX recommends a structure, we first need to understand the event itself: the event type, date, indoor or outdoor use, available site dimensions and what will happen inside the space.
The next questions are practical.
Will there be a reception counter? Products? Seating? Merchandise? A demonstration area? Will visitors queue, stay for several minutes or simply walk through?
This information changes the design.
A 4 × 4 m structure that works well as a reception point may feel completely different once counters, chairs, products and several visitors are added.
Choose the structure around the activity, not just the available square metres.
Plan the Event Footprint Before Choosing the Tent
Confirm the usable site area before choosing the tent size.
Venue dimensions are only the starting point. Height restrictions, trees, barriers, neighboring booths, fixed structures and required access routes can reduce the area that is actually usable.
Then look inside the tent.
A branded event space may need to accommodate furniture, display equipment, products, staff and visitors at the same time. The inflatable beams also occupy part of the nominal footprint.
This is why headcount alone is a weak sizing method.
Ten visitors standing inside an open tent require far less usable space than ten visitors interacting with counters, displays and staff.
The location of walls and openings matters as well. A fully open structure behaves differently from a tent with sidewalls and defined entrances.
For brand activations, ask:
How much usable space does the activity need?
Once that is clear, the tent size becomes much easier to judge.
Our guide to choosing the right inflatable tent size covers footprint, usable interior space and circulation in more detail.
Plan Visitor Flow Before the Graphic Layout
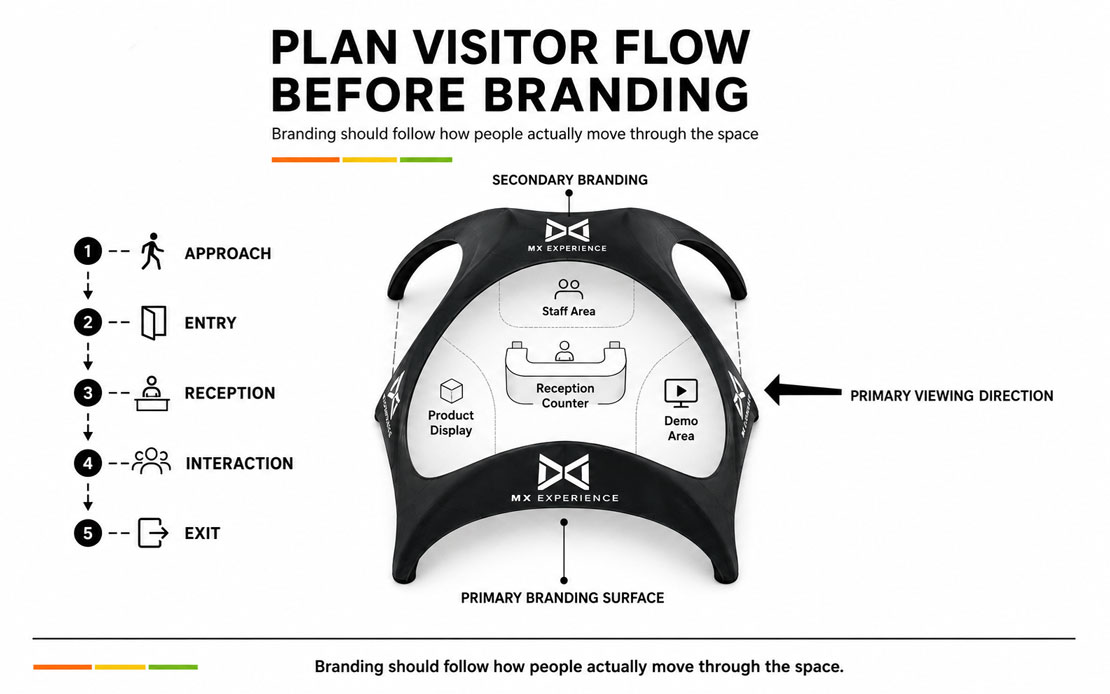
Work out where people enter, stop and leave before deciding where every logo goes.
If the entrance is unclear or a reception counter blocks circulation, stronger branding will not solve the layout problem.
Start with the main approach direction.
Where are people coming from?
What will they see first?
Where should the first interaction happen?
Then look at the movement inside the space. Staff areas, product displays and furniture should leave a clear route for visitors.
A simple activation may only need one obvious entrance and an open front. A larger sponsor or hospitality area may need a more controlled path between entry, reception, interaction and exit.
At an open festival or roadshow, people may approach from several directions. Side visibility then becomes much more important than it would be in an exhibition aisle with one dominant approach.
MX uses this information when deciding the openings, walls and primary branding surfaces.
The graphic layout comes after the movement is understood.
Choose One Main Structure for the Activation
Most activations need one structure that visitors immediately recognize as the brand's main space.
In many projects, that is the inflatable tent.
It can provide shelter while functioning as the reception point, display space, hospitality area or main engagement zone.
At a busy festival, the tent may act as the landmark that helps visitors locate the brand.
A product launch usually needs more controlled product presentation and interaction space.
At a sports event, the structure may become a sponsor base, product area or hospitality point.
A roadshow adds another requirement: the structure needs to create a recognizable branded hub repeatedly across different locations.
The exact tent format should follow that use.
An X-style inflatable tent works well when the activation benefits from several open approaches and a strong central structure. A longer inflatable tent is more suitable when the project needs an extended display zone, larger hospitality area or linear interior layout.
Choose the structure for the event function, not for how impressive it looks in a product catalogue.
Buyers considering the main structure can also review the custom inflatable X tent separately before deciding how it fits into the wider activation.
Prioritize Branding Surfaces by Viewing Direction
Put the most important message where visitors are most likely to see the tent first.
For many activations, that is the entrance-facing side.
Use this surface for the primary logo, campaign identity or one short message. Do not try to place every piece of information there.
The roof has a different job.
It is useful for recognition from farther away, especially at outdoor events, markets, roadshows and large open venues. Large logos and simple graphics work better there than small text.
Sidewalls can carry supporting information such as product imagery, campaign graphics, a website or a secondary message.
Their importance increases when the visitor approach changes.
If most people arrive from the side, that sidewall may become one of the primary branding surfaces.
Inflatable legs are supporting areas. Their printable space is limited, so they work better for repeated logos or simple brand elements than for important slogans, URLs or QR codes.
In MX projects, the entrance-facing surface normally receives the highest branding priority unless the actual visitor direction indicates otherwise.
Branding priority follows viewing direction.
For more detail on proportion, negative space and logo placement, see our guide on how to make a custom inflatable tent look professional at an event.
If you already know the site footprint and main visitor direction, MX can use those inputs to develop a tent layout and 3D concept before production.
Decide Whether the Tent Needs Supporting Structures
A tent is enough for some events. Larger activations may also need an entrance, perimeter branding or additional visual markers.
The structures should have different jobs.
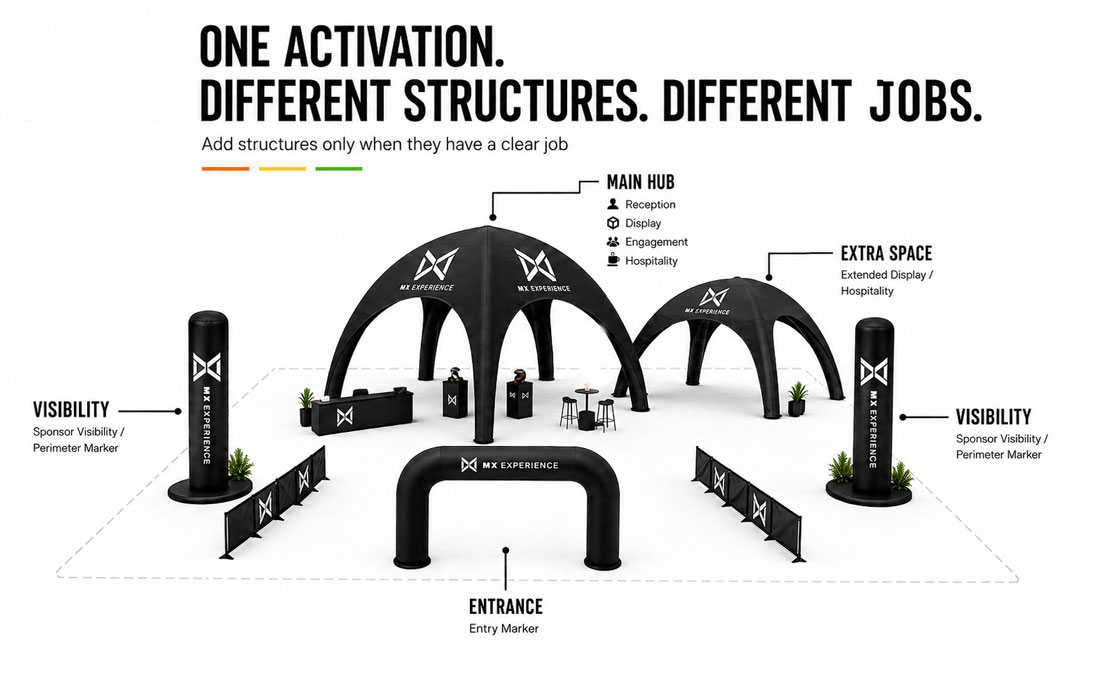
The tent normally carries the main function: reception, display, engagement, hospitality or shelter.
An inflatable arch can define an entrance, transition point or start/finish area.
Inflatable columns can extend sponsor visibility, mark the perimeter or help visitors identify the activation from another direction.
A long inflatable tent adds space when the project needs extended hospitality or a longer display area.
Consider a sponsor zone at a sporting event.
The tent can operate as the hospitality or engagement hub. An arch can make the entrance obvious, while branded columns extend sponsor visibility outside the central structure.
A roadshow may use the same products differently. The tent remains the branded base, but the arch and columns help recreate the same campaign environment at each stop.
For a simple exhibition reception area, that entire system may be unnecessary. One tent can be enough.
The amount of structure should follow what the activation needs to accomplish.
Commercial brand-activation suppliers also group inflatable tents, arches, booths and other structures into larger temporary experiential environments.
When Is an Inflatable Tent Not the Right Choice?
Custom inflatable tents are not the best structure for every event.
If the project requires a very large fully enclosed hospitality building, extensive rigid interior construction, heavy suspended equipment or long-term semi-permanent installation, a conventional event structure may be more appropriate.
Inflatable tents are strongest when the project values:
- distinctive branding
- portability
- repeatable event use
- relatively fast setup
- temporary outdoor or indoor activation space
- a structure that can move between events
A traditional rigid event structure can make more sense when enclosure, structural integration or long-duration installation matters more than portability and branded visual form.
This distinction matters during planning.
The goal is not to force an inflatable product into every brief. The structure should fit the operating requirements of the event.
Keep the Whole Activation Visually Consistent
A tent, arch and column should look as though they belong to the same campaign.
Repeating the same logo everywhere is not enough.
The color system, graphic style, logo scale, campaign message and sponsor hierarchy should remain consistent across the space.
Color deserves particular attention when several structures are produced together.
Pantone provides a standardized language for color communication between brands and manufacturers, and also notes that the appearance of color can change depending on the material.
For MX projects, the customer normally provides the required Pantone reference based on the brand identity or event color direction.
MX then normally prepares a physical color sample for customer approval before production.
This gives the project a practical production reference rather than relying only on how a color appears on a screen.
Visual consistency also means deciding which information deserves attention.
The entrance-facing tent surface may carry the main campaign identity. An arch may only need the brand name and a clean entrance treatment. Columns can repeat simplified sponsor or campaign graphics.
Every surface does not need to say everything.
Visitors should recognize one coherent branded environment from the first long-distance view to the point where they enter the space.
Plan Setup, Accessories and Event Timing Early
Confirm how the space will be installed and when it must arrive before the design is treated as final.
For outdoor use, the site conditions matter.
Anchoring requirements need to be considered, and the project may require accessories such as inflation equipment, stakes, sandbags and storage bags.
Delivery planning should start with the event date.
MX does not apply one generic lead time to every project. We first look at the destination, order quantity and current factory production schedule.
From there, the timeline is worked backward through production and transport.
The important deadline is not the day production finishes.
It is the date the structure must be available for the event.
This matters even more for roadshows and larger activations involving several structures. One missing component can affect the complete branded setup.
If the event date is fixed, share it early.
Our custom inflatable tent ordering guide explains the approval and delivery-planning process in more detail.
Custom Inflatable Tent Brand Activation Checklist
| Planning Check | What to Decide |
| Main Visitor Direction | Which tent surface will people see first? |
| Tent Footprint | What size fits after obstacles and access routes are considered? |
| Interior Use | What must fit inside: counters, products, staff, furniture or visitors? |
| Openings | Which sides need to stay open for entry and circulation? |
| Primary Branding Surface | Where should the main logo or campaign message appear? |
| Roof Branding | Is long-distance visibility important at this venue? |
| Sidewall Use | Are the side surfaces secondary or part of the main visitor approach? |
| Supporting Structures | Does the activation need an arch, columns or a longer tent? |
| Outdoor Setup | What anchoring and accessories are required? |
| Event Deadline | Can production and transport meet the required arrival date? |
This checklist should answer three practical questions:
What does the structure need to do?
How will visitors use it?
Where does the brand need to be seen?
Once those answers are clear, the physical layout becomes much easier to design.
FAQ
Why use a custom inflatable tent for a brand activation?
A custom inflatable tent combines usable event space with a large branded structure. Depending on the layout, it can function as a reception area, product display, sampling station, sponsor space or hospitality hub while remaining visually identifiable across the event site.
What size inflatable tent is best for a brand activation?
Choose the size from the available footprint and what needs to happen inside the tent.
Account for counters, products, furniture, staff, visitors and circulation rather than using headcount alone. Walls, doors and openings should also be considered before the final size is confirmed.
Which part of an inflatable tent should carry the main logo?
The entrance-facing surface normally has the highest branding priority because approaching visitors see it first.
The roof works better for large, simple long-distance branding. Sidewalls can carry supporting campaign or product information. If the main visitor approach comes from the side, that surface should receive greater priority.
How should I plan visitor flow around a branded event tent?
Identify the main approach direction first. Then decide where visitors enter, where the main interaction happens and how they leave.
Keep counters, displays and staff areas out of the main circulation route. Branding should reinforce the entrance and interaction points rather than obstruct them.
How long does a custom inflatable tent take to produce?
Production time depends on the order quantity, current factory schedule and when the final design is approved.
MX asks for the event date, destination and quantity before confirming a workable schedule. Production and shipping are then planned backward from the required event timing rather than relying on one fixed lead-time number.
What information should I prepare before designing a branded event space?
Prepare the event type and date, available site dimensions, indoor or outdoor conditions, intended use of the tent, visitor approach direction, internal layout requirements, branding content, available logo or artwork files, destination and required arrival date.
MX can use that information to develop the structure, layout and 3D design before production details are finalized.
Final Planning Advice
Plan the event first. Then design the tent around it.
Start with the activation objective and site. Work out what visitors need to do and where they will approach from. Decide how much usable space is required. Then choose the structure and assign the branding surfaces.
For a simple reception or temporary display, one custom inflatable tent may be enough.
For a roadshow, sponsor zone, festival activation or larger corporate campaign, the tent can become the central branded hub while arches, columns or additional structures handle entrances, visibility and wayfinding.
That is the difference between placing a branded tent at an event and planning a complete branded event space.
MX is a design-led custom inflatable tent brand and supplier specializing in custom inflatable event tents and branded event structures. Our role is to turn the event requirement into a workable structure, visual layout, production plan and delivery schedule before manufacturing begins.