How to Make a Custom Inflatable Tent Look Professional at an Event
How to Make a Custom Inflatable Tent Look Professional at an Event
A custom inflatable event tent looks professional when visual proportion, three-dimensional design, print quality and production accuracy are controlled together.
Good artwork alone is not enough. A logo can look balanced on a flat screen and still feel too large, too small, off-center or visually distorted once it is wrapped around inflatable beams and viewed at full event scale.
The finished structure also needs to hold its intended shape, keep the outer cover properly fitted and reproduce the approved graphics cleanly.
At MX, we review a custom inflatable X tent as a complete branded structure before production, not as a collection of separate print panels.
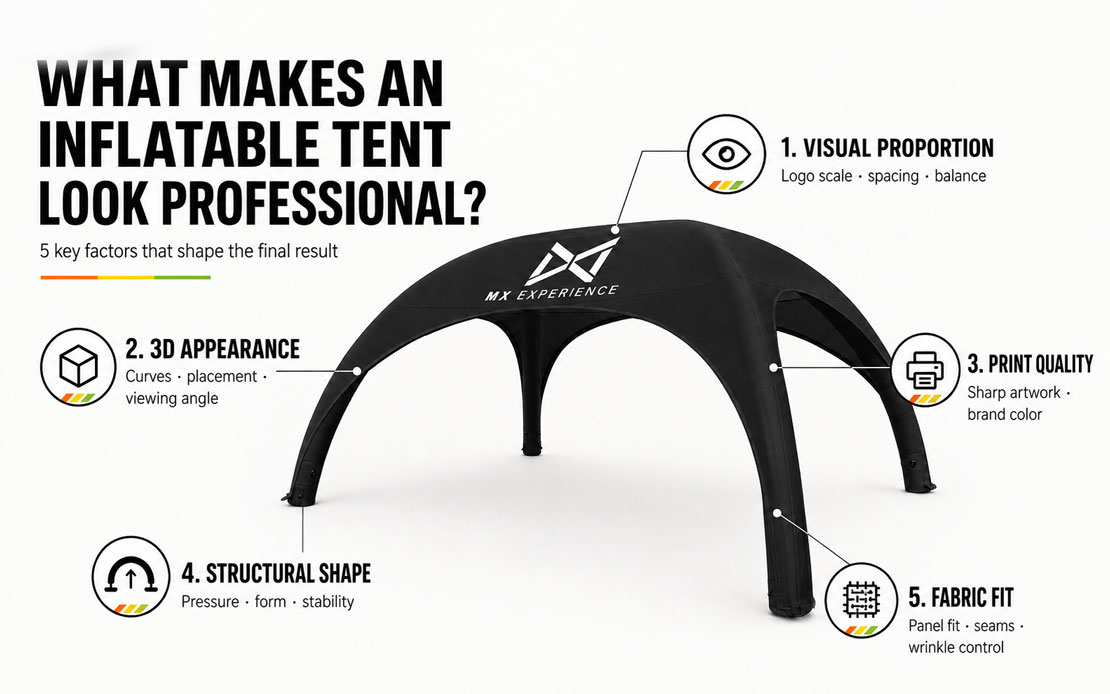
What Makes a Custom Inflatable Tent Look Professional?
| Factor | What Buyers Should Check |
| Visual proportion | Logo scale, placement, spacing and color balance |
| 3D appearance | How graphics look on the inflated structure |
| Print quality | Sharp artwork and controlled brand colors |
| Structural shape | Firm support and correct inflated form |
| Fabric fit | Accurate panel fit, clean seams and controlled wrinkles |
A strong branded inflatable tent depends on all five. Good graphics cannot compensate for a soft structure, and good construction cannot rescue a poorly proportioned design.
1. Start With the Overall Visual Proportion
The first thing people see at an event is the tent as a whole.
Before artwork is finalized, the relationship between the main logo, supporting graphics, color blocks, white space and overall tent size should be reviewed together.
A professional design has a clear visual hierarchy. It does not need every printable surface to be filled.
Match the Logo to the Structure
A logo should be sized for the actual tent, not for the artwork file.
The same logo can look balanced on a 3 × 3 m tent and too small on a larger structure. An oversized logo can also lose impact when it sits too close to seams, openings or curved transitions.
At MX, logo scale is reviewed against the full tent dimensions and the main viewing direction.
The objective is not maximum logo size. It is clear recognition and balanced branding at event scale.
For example: a logo that fills most of a small roof panel may look strong on a computer screen, but once the branded event tent is viewed from across an outdoor activation area, the same logo can feel crowded. The space around the logo is part of what makes it readable.
Use White Space Deliberately
White space — also called negative space in graphic design — is the uncluttered area around the main visual elements. It does not need to be physically white.
Strong event branding normally uses:
- one primary logo or campaign message;
- supporting graphics or secondary information;
- deliberate white space between them.
Filling every printable area usually reduces clarity rather than increasing visual impact.
Design One Branded Structure, Not Separate Panels
The roof, beams, legs, walls, doors and windows are seen together.
Color blocks, logos and supporting graphics should therefore work as one visual system rather than as individually designed panels.
This is why a flat print file should never be the only approval reference for a custom event tent.
2. Design for the Inflated Shape, Not the Flat Artwork
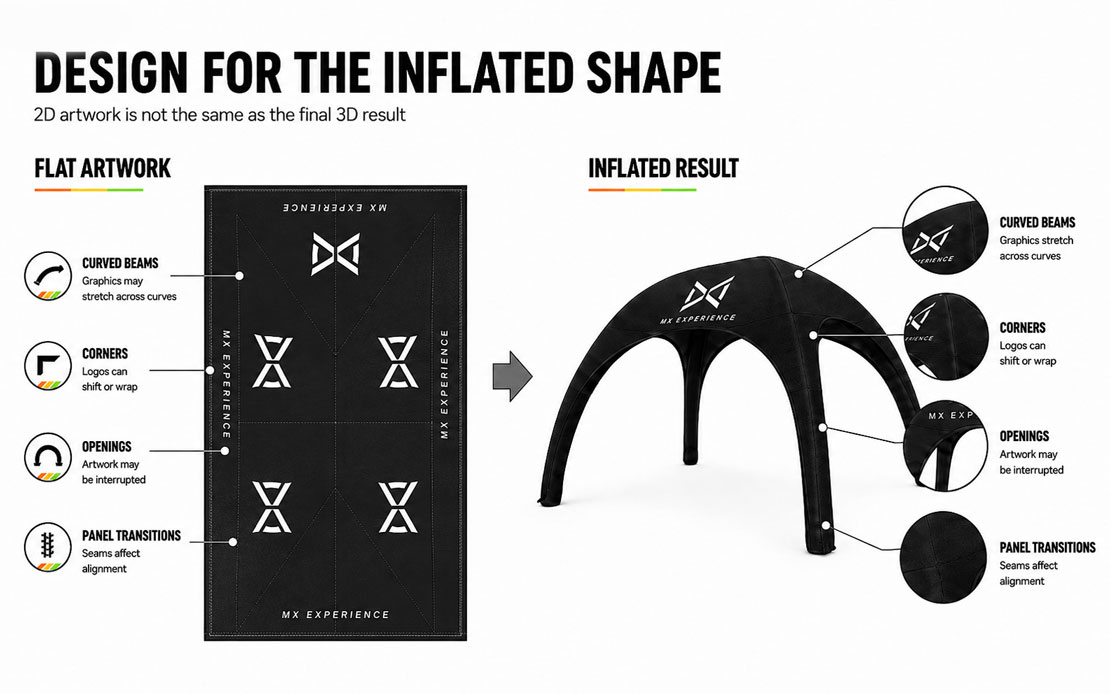
Flat artwork is a production reference. It is not the final visual.
Inflatable beams create curved three-dimensional surfaces, so graphics can appear stretched, compressed, shifted or visually off-center after inflation.
Long lines, text close to corners, graphics crossing panels and logos positioned on strongly curved beams need particular attention.
The right question is not only:
“Is the artwork correct?”
It is:
“Will this artwork still look correct on the finished inflated structure?”
Review Curved Areas Before Printing
The design should be checked where graphics meet:
- curved beams;
- corners;
- panel transitions;
- doors and windows;
- seams and structural breaks.
Where the inflated form changes the intended appearance, the artwork should be adjusted before printing.
This is part of MX's custom inflatable tent design review. The purpose is not to distort every logo. It is to correct the areas where the three-dimensional form changes how the graphic is seen.
For example: a sponsor logo positioned across the outside curve of an inflatable beam can look correctly proportioned on flat artwork but appear stretched once the beam is fully inflated. That is a design-stage issue, not a printing defect.
3. Always Review the Tent in 3D Before Production
A 3D visual shows whether the complete tent looks right before production starts.
The buyer should use it to check:
- logo size and position;
- white space;
- overall color distribution;
- doors and windows;
- graphics on curved areas;
- primary viewing angles;
- balance of the complete structure.
A flat production file answers a different question: whether the graphics are ready to be printed on each panel.
Both references are necessary, but they serve different purposes.
You Do Not Need Finished Artwork to Start
A customer can begin with a logo and a clear idea.
MX designers can build the layout, recommend changes to logo size or placement and prepare a 3D tent design for review.
If the original concept weakens the final visual result, the designer provides a professional recommendation and the customer makes the final approval.
The practical rule is simple:
Approve the tent as a three-dimensional object before approving it as a production file.
4. Get Logo Placement and White Space Right
Logo placement should follow the way people actually see the tent at an event.
The strongest branding should sit in the primary viewing areas rather than simply filling every available printable surface.
A front view, three-quarter view and side view can produce very different visual results.
Bigger Is Not Always Better
An oversized logo can feel crowded, interfere with openings or move too close to curved surfaces and seams.
The correct size keeps the logo easy to recognize while leaving enough space around it to stand on its own.
Prioritize the Important Surfaces
The roof, beams, legs, walls and entrance areas do not carry the same visual weight.
A practical hierarchy is:
- primary brand logo;
- campaign or event message;
- sponsor or secondary branding;
- quieter supporting areas.
At MX, logo placement is reviewed together with viewing direction, openings and the complete 3D structure before production approval.
5. Control Brand Color Before Printing
Brand-critical colors should not be approved from a screen alone.
A Pantone reference gives the buyer, designer and production team a defined color target to work from.
For a custom printed inflatable tent, the practical workflow is:
Confirm Pantone Reference → Prepare Color Sample → Customer Approval → Production
At MX, this process is used when color accuracy is important to the project.
Use the 3D Visual and Physical Sample for Different Jobs
The 3D visual confirms:
- color distribution;
- contrast;
- overall visual balance.
The physical sample confirms the production color reference.
A Pantone reference should be treated as a defined color target, not as a promise that every screen, material and printing process will reproduce color identically.
6. Print Sharpness Matters as Much as Color
A custom printed inflatable tent needs clean, scalable artwork to maintain sharp branding at full event scale.
Small JPG or PNG files can look acceptable on a screen but lose clarity when enlarged for large-format printing.
Vector artwork is preferred because it can be enlarged without pixelating the edges. AI, EPS, PDF and SVG files are therefore better starting points for logos and other scalable graphics.
If the customer already has a designer, MX first asks for the original design file or a higher-quality version.
If no usable source file is available, MX can provide free design support to redraw or rebuild the artwork before production.
The rule is simple:
Do not enlarge a weak logo and expect the print to improve it.
Check the source file first, correct it if necessary, then confirm the final layout in 3D.
7. A Professional Tent Must Hold Its Shape
For an air-sealed inflatable X tent, correct inflation pressure is essential to both stability and appearance.
Low pressure makes the inflatable beams softer, increases visible movement and reduces the structural rigidity required to maintain the intended form.
Even strong branding will look poorly finished if the inflatable event shelter itself appears under-inflated.
Before judging the final shape, inflate the tent to the operating pressure specified for that model.
MX treats structural form as part of the visual result.
Good graphics cannot compensate for an under-inflated structure.
8. Fabric Tension and Fit Affect the Final Look
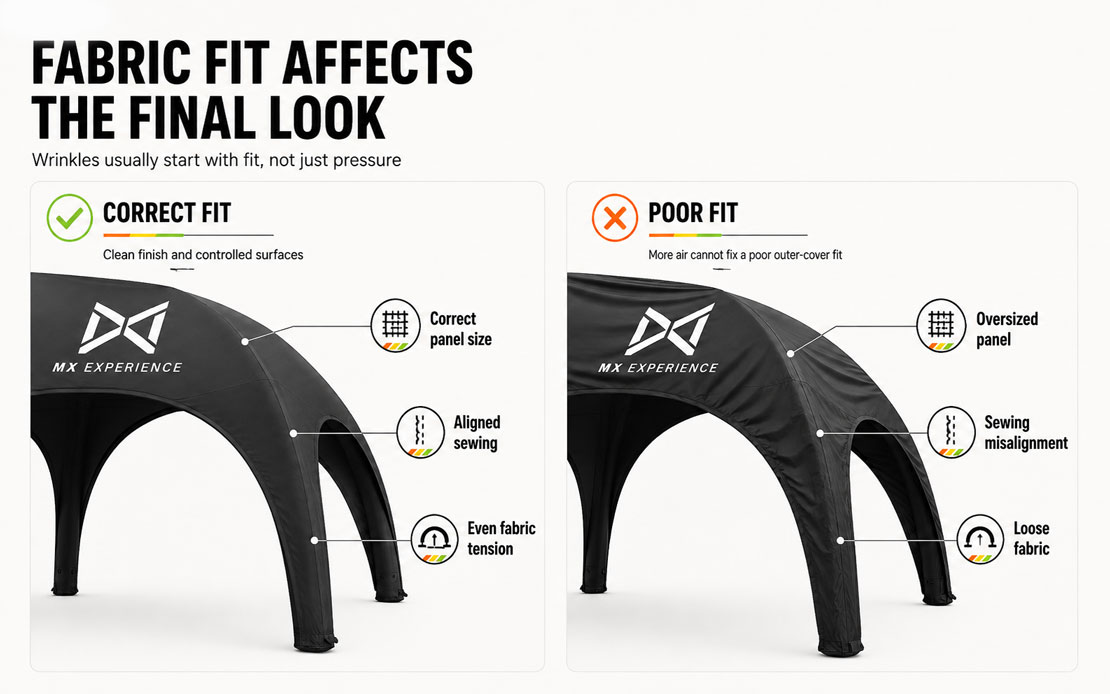
Wrinkles usually start with fit.
The most common causes are inaccurate panel dimensions and sewing errors.
When the Oxford outer cover does not match the inflated structure correctly, the fabric cannot tension evenly. Visible looseness, uneven areas and wrinkles then appear across surfaces that should sit cleanly against the structure.
Inflation pressure still needs to be correct, but pressure cannot compensate for an incorrectly sized or poorly sewn outer cover.
At MX, the main checks include:
- panel dimensions;
- sewing alignment;
- seam position;
- consistency between connected sections;
- how closely the outer cover follows the inflated frame.
For example: if one section of the Oxford cover is cut larger than the corresponding inflated structure, adding more air does not remove the excess material. The loose area remains because the fit itself is wrong.
Smooth fabric tension is the result of correct fit, not simply more air pressure.
9. Small Production Details Decide Whether the Tent Looks Finished
MX X Tents use a TPU inner bladder with an Oxford fabric outer cover.
The TPU bladder holds air. The Oxford outer cover defines much of the visible finish and protects the inflatable structure during use.
That makes panel fit, seam alignment, edge finishing and dimensional accuracy important to the final appearance.
For buyers, the visual inspection is straightforward:
- adjoining panels should align cleanly;
- seams should follow the intended structure;
- corners and transitions should look controlled;
- graphics should remain in the approved position.
Production accuracy is part of the branding result because dimensional or sewing errors can shift logo position, change white space and reduce the clean appearance approved in the 3D design.
10. What Should You Check Before Approving Production?
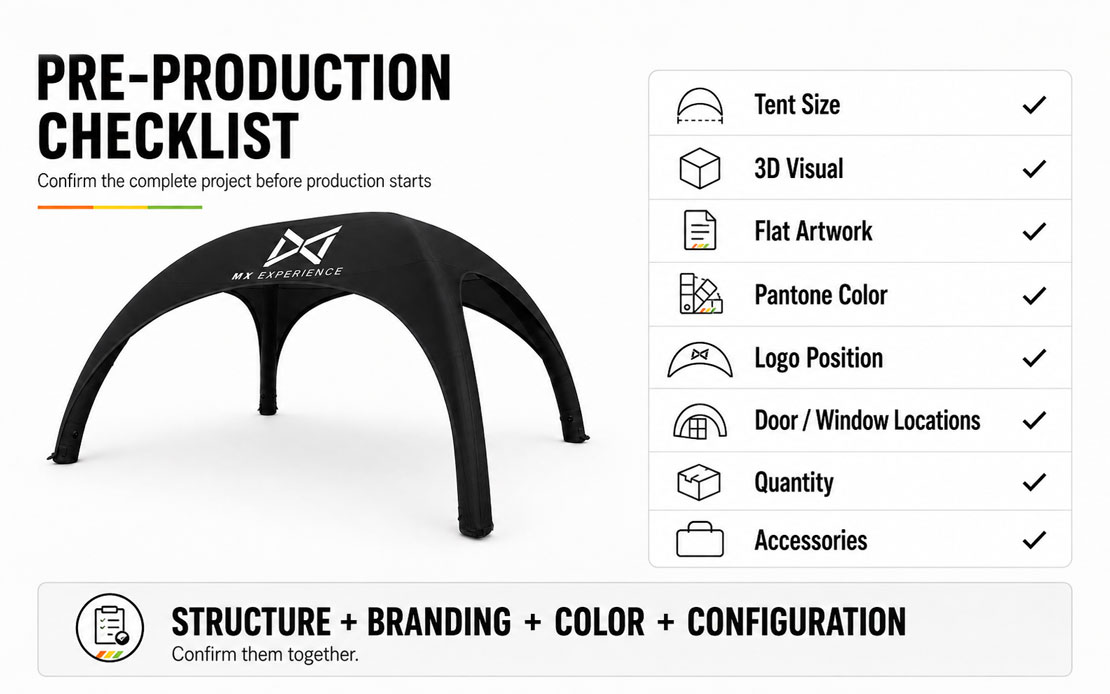
Before production starts, confirm the complete project rather than approving only the logo or artwork.
The final check should include:
- tent size;
- 3D visual;
- flat production artwork;
- Pantone color reference;
- logo size and position;
- door and window positions;
- quantity;
- accessories.
These items affect one another.
A size change can alter logo proportion. A door or window can interrupt a graphic. A color change can alter visual balance.
At MX, production approval is treated as a complete project check:
Structure + Branding + Color + Configuration
All four should be confirmed together.
The choice between one large tent and multiple smaller tents can also affect how a brand space feels visually, especially when creating a unified customer experience.
MX Approach: From Logo and Idea to a Production-Ready Tent
MX is a design-led custom inflatable tent brand and supplier specializing in custom inflatable event tents.
Customers can start with a logo and a clear idea.
MX then helps review the tent size, branding layout, logo position, color reference and overall 3D appearance before production.
If the original layout is likely to weaken the final visual result, the MX design team provides a professional recommendation for the customer to review.
The process is straightforward:
Logo + Idea → Design Review → 3D Visual → Customer Approval → Production
This approach connects design decisions with the actual finished structure instead of treating printing and production as separate steps.
Frequently Asked Questions
What artwork files do I need to supply for printing?
Vector files are the best choice for custom tent printing because they can be enlarged without losing edge clarity.
AI, EPS, PDF and SVG files are preferred. High-resolution JPG or PNG files can also be reviewed, but low-resolution images may need to be redrawn before large-format printing.
If a usable source file is not available, MX can assist with rebuilding the artwork before production.
Will my logo look the same on the finished inflatable tent as it does in the artwork?
A logo can look different after inflation because flat artwork does not show how graphics will appear on curved three-dimensional surfaces.
Logo size, placement and proportion can change visually once the artwork follows inflatable beams, corners and panel transitions.
The final branding should therefore be reviewed on a 3D visual before production, not only on the flat print file.
How big should my logo be on an inflatable tent?
The correct logo size depends on tent dimensions, viewing distance, placement and surrounding white space.
The largest possible logo is not always the strongest option.
A logo that is too large can feel crowded or interfere with seams, openings and curved areas. The final size should be judged on the complete tent rather than on an isolated artwork panel.
How do you make sure the printed color matches my brand color?
Brand-critical colors should be confirmed with a Pantone reference and a physical color sample before full production.
The Pantone reference provides a defined color target, while the printed sample allows the buyer to review the actual production result.
At MX, the approved sample is used as the production reference when color accuracy is important.
What causes wrinkles or loose fabric on an inflatable tent?
Wrinkles and loose fabric are most commonly caused by inaccurate panel dimensions or sewing errors.
When the outer cover does not match the inflated structure correctly, the fabric cannot tension evenly.
Inflation pressure also affects surface tension, but additional air cannot correct an incorrectly sized or poorly sewn outer cover.
What should I check before approving my custom inflatable tent for production?
Confirm the entire project before production:
tent size, 3D visual, flat production artwork, Pantone reference, logo position, door and window locations, quantity and accessories.
These items affect one another.
Production should begin only after the structure, branding, color and configuration have been confirmed together.
Conclusion
A professional-looking custom inflatable tent is the result of design control and production accuracy working together.
Logo proportion, 3D review, color confirmation, print clarity, structural shape and fabric fit all affect the finished appearance.
The core principle is simple:
Judge the tent as a complete inflated structure, not as a flat artwork file.
Have a logo or an initial tent idea?
MX can help turn it into a 3D concept before production.